Hard to believe that August is almost here, and some of us are heading back to school! The first week of school is a blur with library rules and expectations, but by week two or three, I am ready to implement my CREATE station system. In my elementary school, I used to see 6 classes a day, kindergarten through 5th grade for 45 minutes a day. Once you get through all the introductory library information, it is comforting to get into a routine, and I love nothing more than our CREATE stations to keep our students engaged. Believe it or not, I get these started by the second week of school.
CREATE stations are 6 stations that our learners rotate through, and they may change depending on the topic or theme. Not only is each station given a name, but it is also color coordinated. The acronym CREATE gives us a framework for our stations. Each week, students will listen to a story, visit ONE station, and check out books. If you need stations to take less than 6 weeks, I also like the acronym SOAR. Why use an acronym? It helps keep everything themed and organized. In fact, by the end of the first month of doing stations, students will walk into the library anticipating which station they will be assigned to that week.
I know every school is different, but my schedule normally followed this pattern:
Fifth/Second/Third/ (LUNCH/PLANNING)/Kindergarten/First/Fourth...REPEAT Monday through Friday. Here we go...
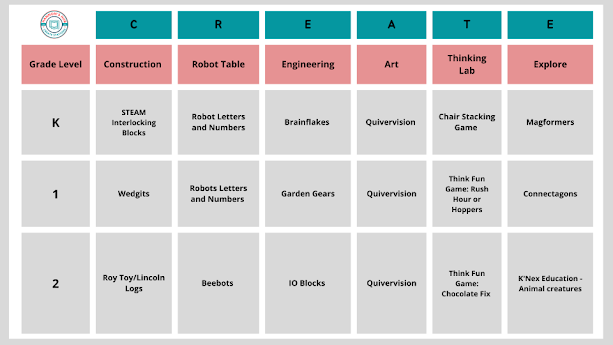
These two charts are a big-picture overview of the stations I complete throughout the year. These are all very straightforward and students can usually get started with minimal guidance. Click the chart below to access links, explanations, and products.
SEMESTER ONE: (almost every box has a link for you to click!)
 |
| Click on the image above to access a Google slide with links to the products as well as links to my blog posts that explain how I implement the activities. |
 |
| Semester two doesn't look too much different from semester one, but I introduce robots to second grade (and sometimes first grade) and start using Quivervision in the art stations. |
Step ONE: What does each station mean? It can actually change throughout the year because I like to keep things fluid, but for K-2, our stations normally follow this layout:
C - Construction (or Computer)
R - Robots (or Research)
E - Engineering
A - Art (and Design)
T - Thinking Lab (or Tablets)
E - Explore
Having the letter E twice in the acronym can be tricky, but we make it work. Often times the engineering and explore stations are interchangeable, so I don't overthink it. It is also important to note that I have learned not to change up the activities with the frequency that I used to. Students will rotate through each station a maximum of 6 times. By the time you factor in assemblies, testing, snow, hurricanes, and any other disruptions (natural or otherwise) that we experience in the specials rotation, our learners don't actually make it through 6 times. As a result, the stations don't feel repetitive, and our classes look forward to cycling through them a couple of times. In fact, I have upset students when I changed them around!
Step TWO: Once the schedules are set and more or less confirmed (students are no longer changing classes), I create charts using GOOGLE slides; I put them in groups and assign them to their first station. This blog post provides a template you can use: The mechanics of CREATE stations. If you make a copy of the Google slides, you will see a template for my Monday classes. I duplicate the entire presentation 5 times (one for each day of the week.) Once the students' names are inserted, I group the column, so moving them from station to station is even easier. To clarify, students stay with their groups, so if they are absent that week, they will just miss that station. If I have to rearrange groups to accommodate behaviors, a student may repeat a station they just did OR skip a station. We have to be flexible, and I see too many students to try and track if and when a student misses a station!
Step THREE: Create grade-level buckets. Most of the stations are self-explanatory except for the robot station and sometimes the art station. Each bucket is clear, and I attached a label that indicates the station and the grade level. We printed our signs on cardstock and taped them to the inside of the bucket, so they were clearly labeled:
The labels are very simplistic and straightforward. Click HERE if you would like the Canva template link, so you can modify them for your needs.
Step FOUR: Break down the 45-minute time frame. My previous blog post, Counting Down the Minutes, explains how I allocate time and has links to my favorite timers. Back in the day when I first started teaching, I was an 8th-grade English teacher, and we had 7 periods a day that lasted 45 minutes. It taught me the art of squeezing it all in!
Hope this is helpful! I will post my grades 3-5 overview next!


.png)


%20Blog%20Banner%20-%20E%20is%20for%20EXPLORE%20-%20Magformers.png)

0 comments:
Post a Comment